I dug a hole: adventures in quarantine madness

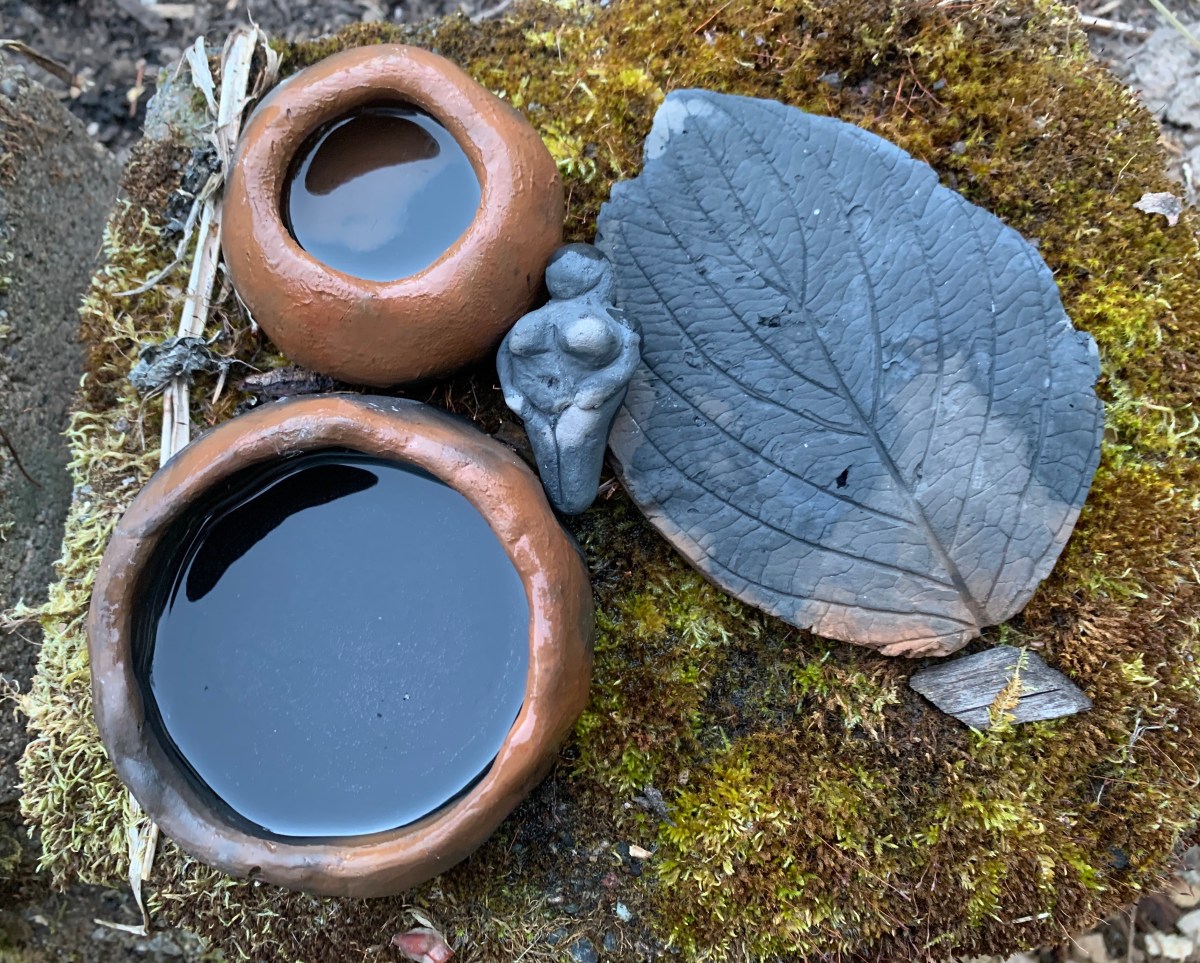
Spoiler for the rest of this post: I made these using dirt from my yard! And fire! Ha ha!

Hey so this whole global plague this is fun, yeah? Economic collapse, feeling of hopelessness, constant threat of debilitating illness and/or death? So fun! And I live in the US, so I am definitely 100% not terrified that the literal criminals running the country are going to get me killed! Ha ha! o_o

ANYWAY, while I’ve been home I’ve started actually diving into some of the particularly wacky “someday!” projects that I’ve been dreaming about for years. I love learning by doing, and I’ve always been really drawn to “deep wisdom” types of things like making cordage from tree bark and harvesting wild plants. We’ve been dealing with a major rat infestation in our entire neighborhood, and I was starting to seriously consider learning to tan tiny hides and make myself a cool apocalypse cape, but my wife strongly vetoed that. (Incidentally, before COVID hit, this winter I let a student talk me into mummifying a chicken toe as a little class side project, which inspired me to mummify an entire chicken foot, which I just remembered is in my garage somewhere because I tried to hide it from my wife so she wouldn’t throw it away — I should probably find that.)

One of those things I’ve always wanted to try was digging my own clay and making primitive pottery. I think a lot of people have this on their bucket list, actually; we must all read the same formative books. Lockdown gave me the motivation I needed to actually give it a go — with nowhere to go, why not do weird projects in the yard? It was time-consuming, but not actually that difficult, and every part of this project was 100% free. I’m hoping to do a how-to video at some point, but for now here’s a rough description of my process in case you want to try something like this yourself.

Bonus: this project resulted in me now having a fire pit in the yard

The first step is to dig a hole. It should be a relatively big hole, and the soil should have a high clay content. Save the dirt you dig out of the hole. If you want to use the same hole to pit-fire the clay, you can make it a bit fancier by lining it with bricks, as shown here.

To separate the clay from the rest of the dirt, you’ll take advantage of the fact that clay particles are much, much smaller than the other stuff in your dirt. Put some of the dirt you dug into a bucket and cover it completely with water. Let it soak about a day and stir it every so often. When you’re ready, give it a really vigorous stir and pour the dirty water through a screen into another bucket. This gets the big stuff out. Discard that big stuff and rinse the first bucket well.

Let the dirty water sit for 10-15 minutes. This allows the larger particles (sand, silt) to settle, but leaves the clay behind. While you wait, put a basket or colander in the first bucket and line it with cloth, an old bed sheet folded in half is ideal. Then, carefully pour the water-and-clay suspension into the cloth and let it drain to dry. Full disclosure: I found I had to pour the clay suspension into a third bucket while I waited for the water level in my cloth strainer to go down enough to add more to it, so be flexible about this part; the goal is to have the water catch the clay. It’s sort of like draining cheese. Let the clay drip dry until it’s pliable enough to use. For me this took many days, probably about a week all told.

You can wedge the clay to get the air bubbles out, which I didn’t really know how to do so I sort of half-assed that part, then build whatever you want to make. I made pinch pots, a goddess figurine, and used a leaf to make an impression on a thin slab of clay. It’s important to keep your pieces thin enough to dry easily. Once you’re happy with what you’ve made, put them in a safe, covered space and let them air dry as long as you can stand it. I think I made my first round of stuff in like April and didn’t fire them until July. Steam is what makes pots explode, so if you know you didn’t do a great job getting the air bubbles out, drying is crucial.

To fire your pots, line the bottom of your fire pit with wood shavings or sawdust, and use this to fill any spaces in the pots themselves. Arrange the pots in the pit and cover them with flammable stuff — paper, sticks, kindling, wood, etc. Light it on fire (yay!) and make sure the fire gets big and hot, because the clay needs to glow red to undergo the chemical changes of firing.

I obviously said “COOOOOOL!!!!” out loud when I peered down into my fire pit and saw a glowing pot.

Let the fire burn down to coals, and make sure the pottery is completely covered. I took the photo above when I was moving stuff around to get coals over that pot. If you want, you can smother the fire at this point by dumping dirt or sand on it. This causes the clay to turn black, which looks really cool. It also means you don’t have to hang out and watch your fire burn all the way down, and it gives your pottery a chance to slowly cool down, which reduces breakage.

The next day, when the sand / dirt is cooled off and you can easily dig into it with your bare hands without fear, it’s time to find out if it worked.
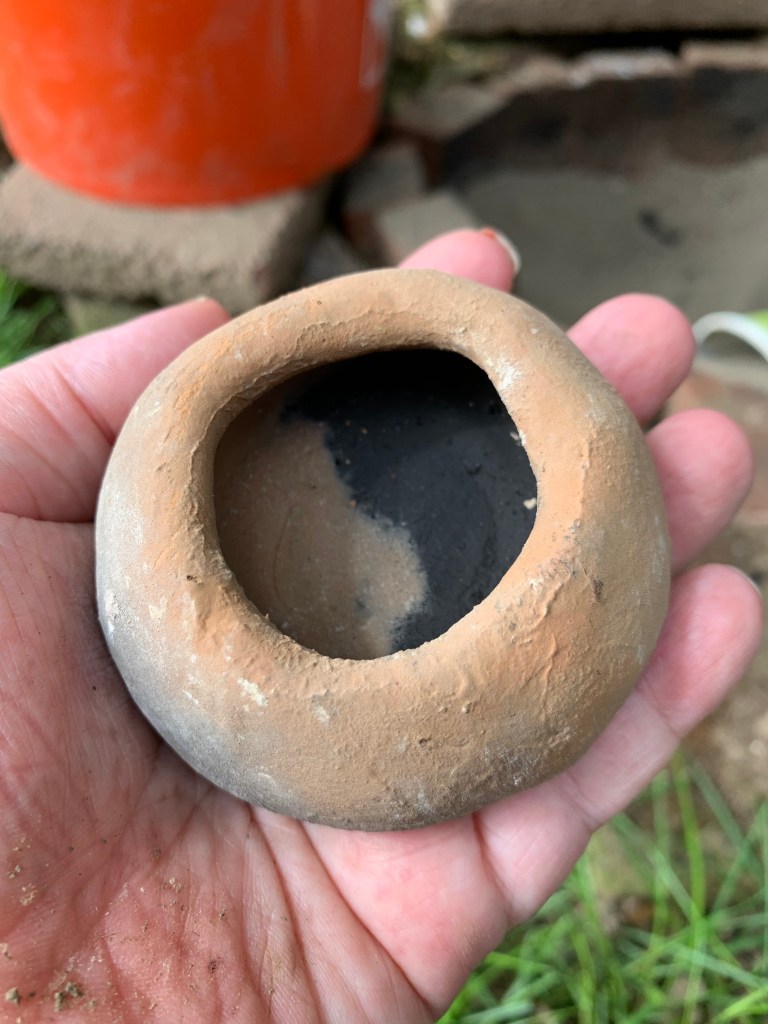
I like the natural red color and the black together.

I was so astonished that my pots didn’t break and that they were actually fired that I laughed out loud when I dug them up.
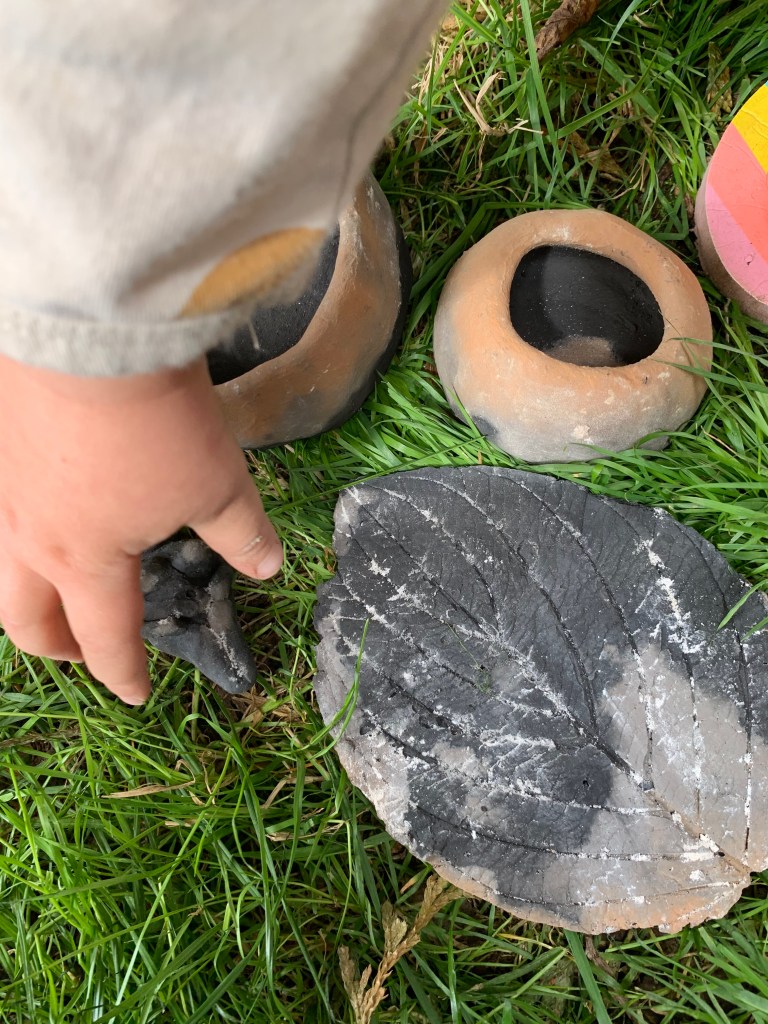
My two-year-old helped dig out the finished pottery. He was most interested in the “puhsun” (person) and “eef” (leaf). Although parts of it aren’t suitable for kids, a lot of this project was something that he and I could do together. He helped me dig the hole, he helped me with stirring and straining all that muddy water, he loved squishing the clay in his hands, and he helped me pick a leaf and press a ball of clay onto it for a second leaf plate (which is still drying). Older kids could have even more fun with this, and the opportunities for learning about history, archeology, art, physics, and chemistry are immense.

I hope this post inspires you to do a project that you’ve always wanted to try, especially if it’s something you’re not an expert at. I knew basically nothing about any of this when I started; I sort of understood some of the science behind it, which probably helped, but really when it comes down to it I just read a lot of guides online and then let myself experiment. You, too, can do the thing! And if you make a cape out of rat pelts, let me know how it goes, because I’m honestly still considering it.

Let’s play… battledore!

Battledore (or shuttlecock, or battledore and shuttlecock, or jeu de volant) was the precursor to badminton. It’s played with two paddles (battledores) and a feathered “birdie” (shuttlecock). On Pinterest recently, I ran across this medieval image of two people (boys? youths?) playing battledore:

A medieval game of battledore. Frustratingly, there wasn’t any attribution on this image; it looks 15th century to me, possibly late 14th, but that’s pure speculation on my part.

The players each hold a paddle, which look to me to be wooden and not particularly complex. (Side note: I’ve seen a few references to children in the early modern period using hornbooks to play battledore.) The birdie is clearly feathered, with an elongated body. During gameplay, the object was to keep the shuttlecock aloft as long as possible, batting it back and forth between two players.

As part of my historical games kick, I decided to put together a quick and easy battledore set:

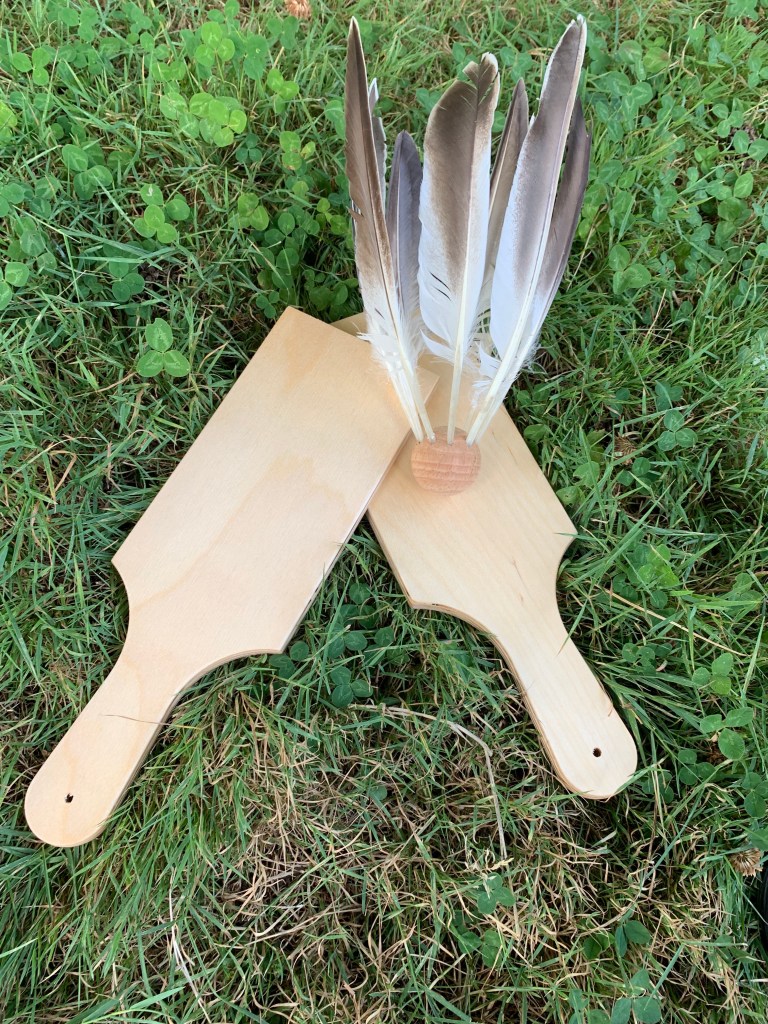
My battledore set, with wooden paddles and a cork and feather shuttlecock.

This took me maybe 10 minutes to put together, and I got all the supplies on Amazon: I used two wooden paddles sold as ceramics tools, a cork ball, and some duck feathers. I gave the paddles a light sanding to make them feel better in my hand. For the shuttlecock, I used an awl to poke holes evenly around one “pole” of the cork ball and carefully stuck feathers into the holes. That’s it! Done! Ready to play!

If you wanted to do more, you could carve your own paddles, or paint them with your badge. Also, if you don’t want to shell out for a fancy cork ball, as you can see from the period image a standard cork is perfectly acceptable. I used a large cork I found in a park to make a second shuttlecock, and while I found that the cork ball is more balanced I don’t know how crucial that is to enjoying the gameplay.

Stocking a Medieval Games Box

Open games box
My medieval games box with GlĂĽckhaus board on lid… and I just noticed that the dice showing include my “naughty” dice! Whoops!

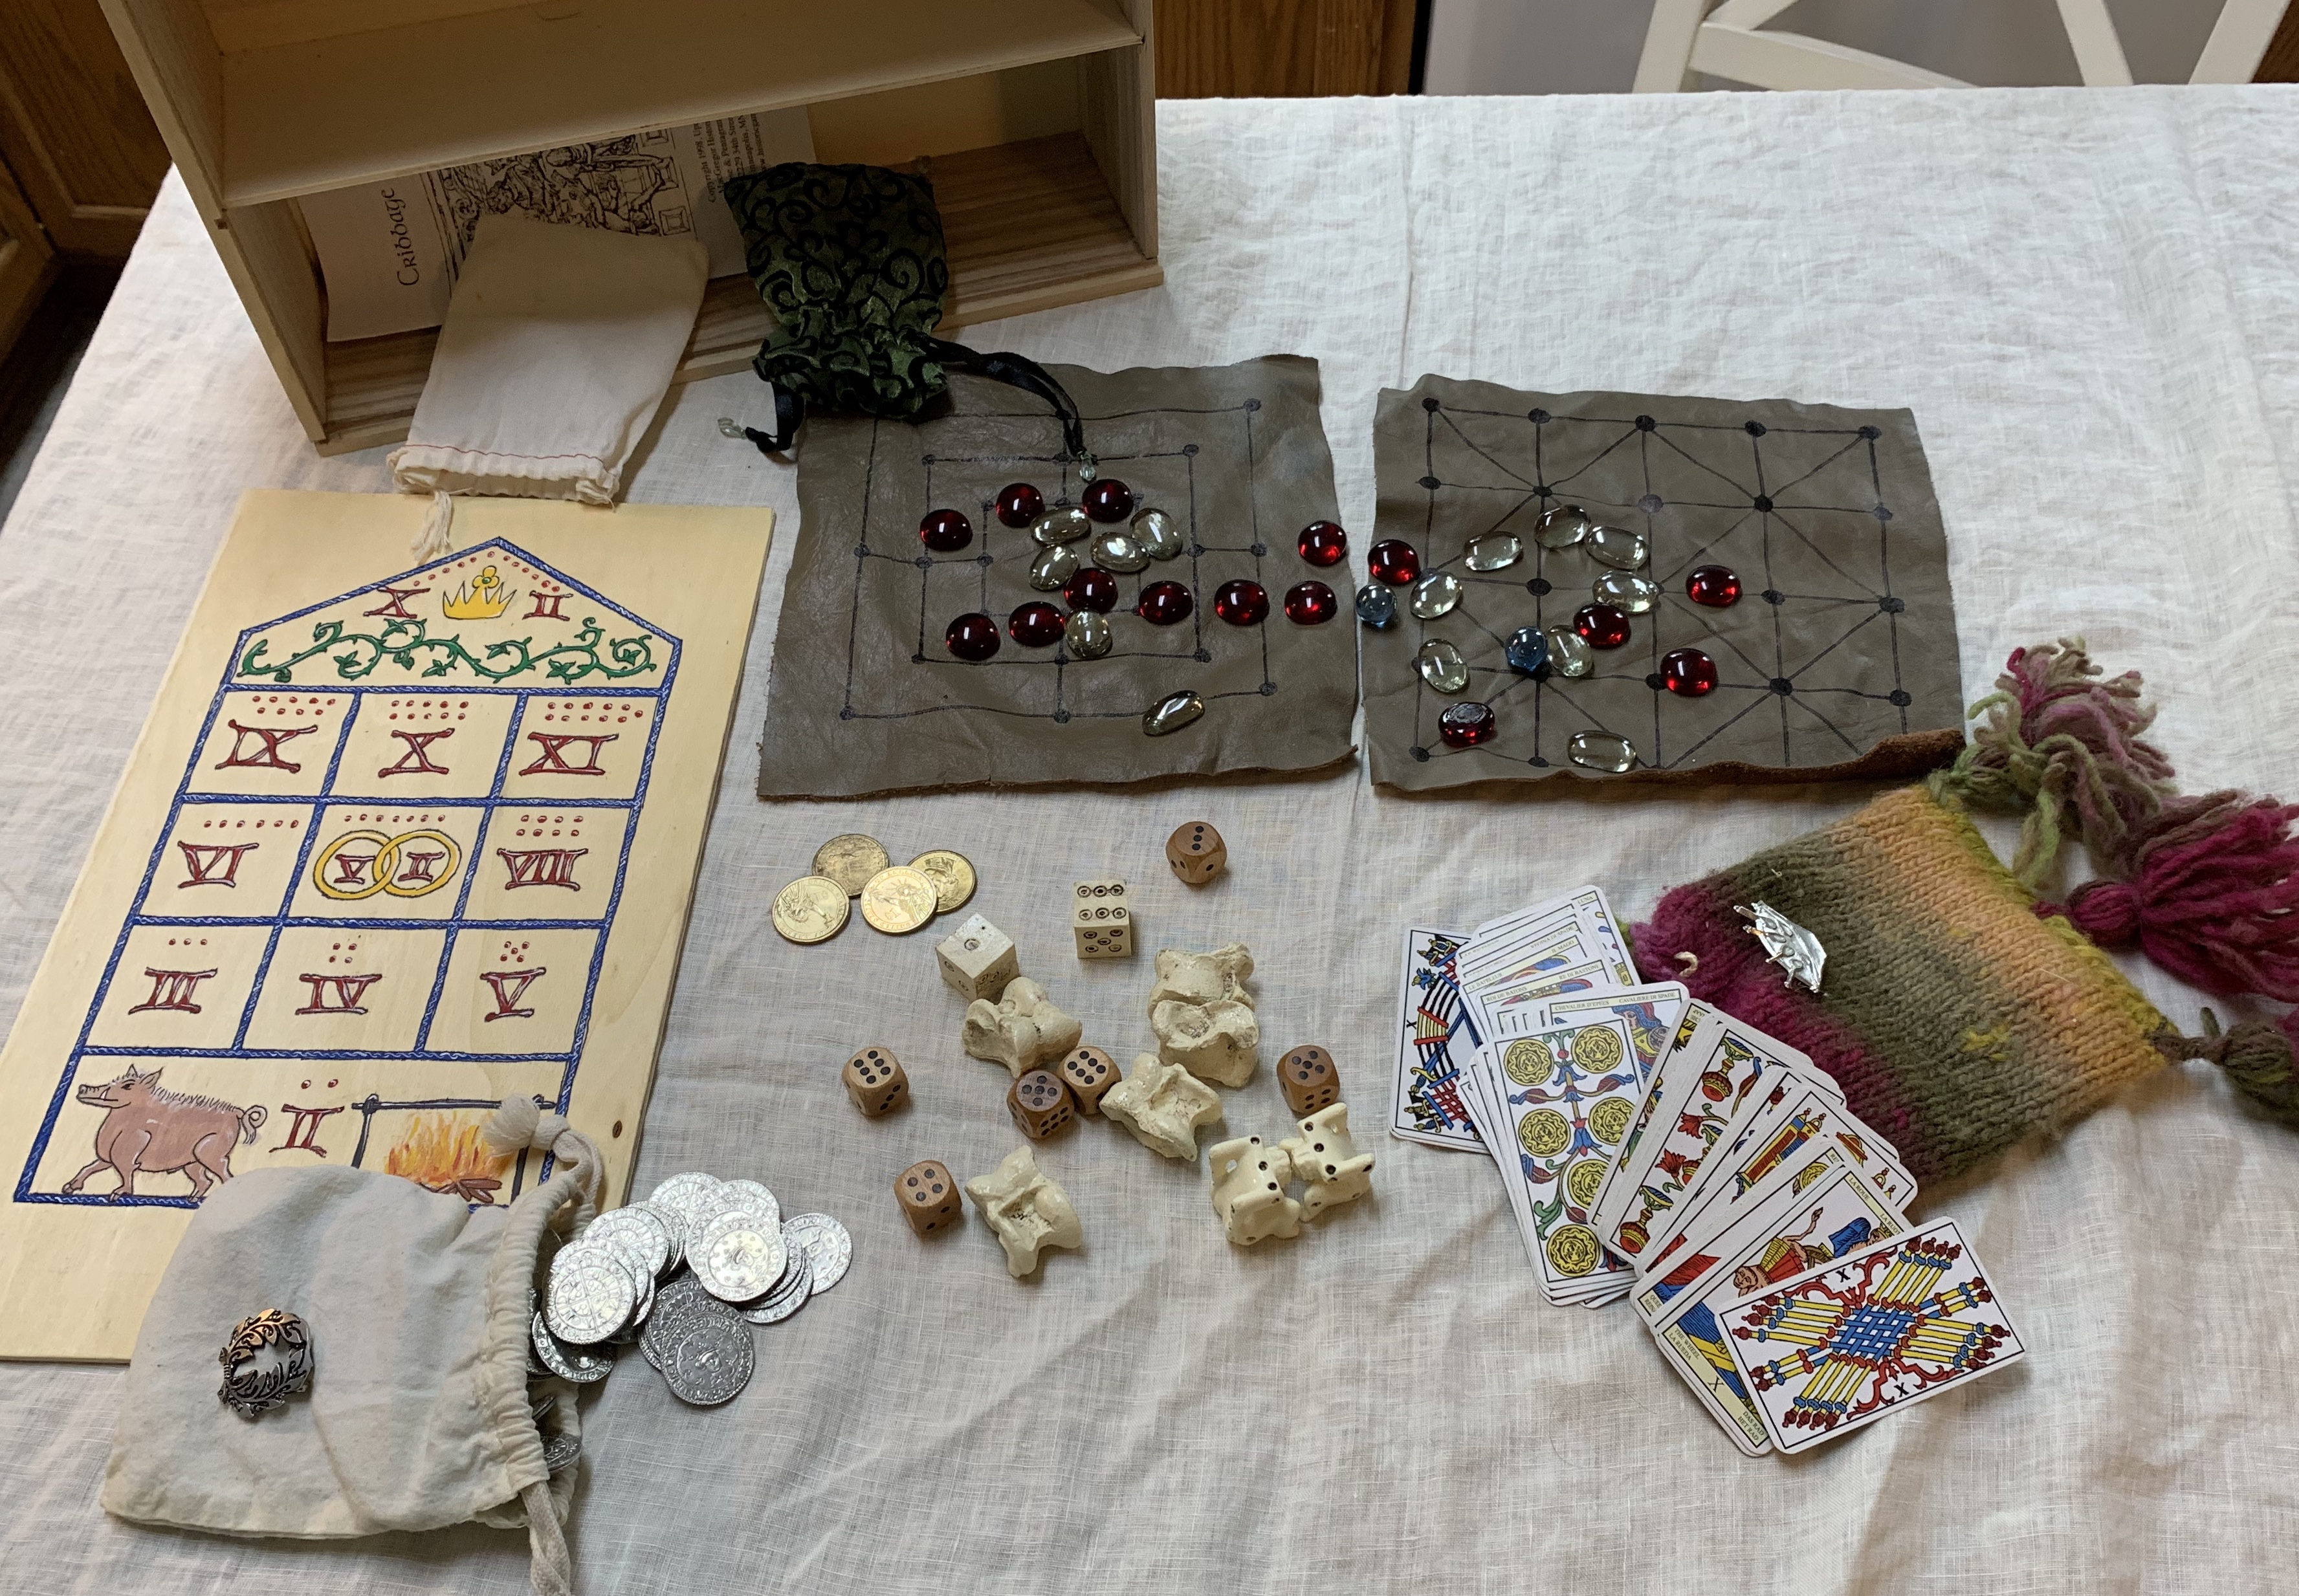
The SCA is not a spectator sport, you have to make your own fun. I am not much of a gamer in modern life, but I love having historical games to play at events. I have collected some of my favorites in a box (see previous post for information about the painted GlĂĽckhaus board on the lid!) — Nine Men’s Morris, Alquerque (the ancestor of checkers), knucklebones, assorted dice, and a tarot deck, plus tokens and such for game play and pouches to store things in.

Here’s a photo of the full collection all spread out:

img_4801
A bounty of medieval games!

There are lots of resources online about medieval and renaissance games — I really like this simple yet comprehensive guide that includes ball games, running games, throwing games, board games, card games, dice games… lots of games! The best way to find out what games you like to play is to play some, so I suggest you either make/buy yourself some stuff to get you started or find games to join at events to see what strikes your fancy.

To create a general-purpose historical games set, you’ll need:

  • Game boards that are easy to roll up and transport (so, sewn/drawn/painted on cloth or leather)
  • Dice
  • Knucklebones (either the real deal or resin replicas)
  • Flat marbles, colorful stones, wooden pieces, or other markers in at least two colors
  • Replica coins or other tokens to gamble with
  • Card decks

There’s a great online resource for all manner of historical games, MacGregor Historic Games. This is where I got my dice sets and knucklebones, and they also sell instruction booklets and some coins/tokens. I also found a set of tiny bone dice and weirdly colorful knucklebones while I was hunting for game supplies on Amazon, but I can’t personally vouch for them.

I made the nine men’s morris and alquerque boards the better part of a decade ago with some scrap leather, a ruler, and a permanent marker. To make your own, find some smooth, garment-weight leather pieces big enough to be worth using (I think mine are about 8 inches square), look up images of the game boards you want to make, measure and mark. For playing pieces, flat marbles are easy or get some wood discs and paint / mark them. Or go historical and gather some pebbles 🙂

When it comes to card games, I really, really like tarocchi / tarock / triumph / tarot. You can learn more about how to play and the history of tarot cards on Wikipedia. (As an aside, do I lose all credibility forever by admitting that I think Wikipedia is a great resource for stuff like this? I wouldn’t use it as documentation for an A&S championship, but to quickly learn a little about a topic it can’t be beat. I digress.) My personal preference is to use a Tarot de Marseilles deck, as it has a historical look and doesn’t have the “occult” connotation that many modern people associate with tarot decks. I also like the mini version, as it’s easier to hold the cards (and keep them secret!) during game play.

I recommend getting some pouches to keep everything organized. I personally like the inexpensive muslin ones that they sell for things like wedding favors, because then when I inevitably lose a few it’s not a big deal. Plus, I always need more tiny bags.

One thing that’s been challenging for me to find for my games box was coins or tokens to use for gambling games that weren’t terribly expensive and looked at least passably historical. I’ve played a lot of rounds of GlĂĽckshaus with standard modern pennies, honestly, because the price can’t be beaten. I have some replica groats that I purchased when I got laureled, but now the maker seems to not have his site up anymore so I can’t send you to him. One option that I’m considering are some replica “dubloons” — I suppose I could call them gold marks, but the idea of gambling with gold marks is OUTRAGEOUS from a historical perspective; nobody has that kind of money! But look how shiny they are, and 19 bucks for 50 coins is about the best price you’ll find.

Hopefully this is enough to get you started assembling your own set of games. These are all “indoor” games, of course; I’m working on making some equipment for simple outdoor games like quoits and battledore, and you can probably look forward to posts about those as I get them finished.

Medieval Games Box with Painted Gluckhaus Board Lid

Games Box with Gluckhaus Board
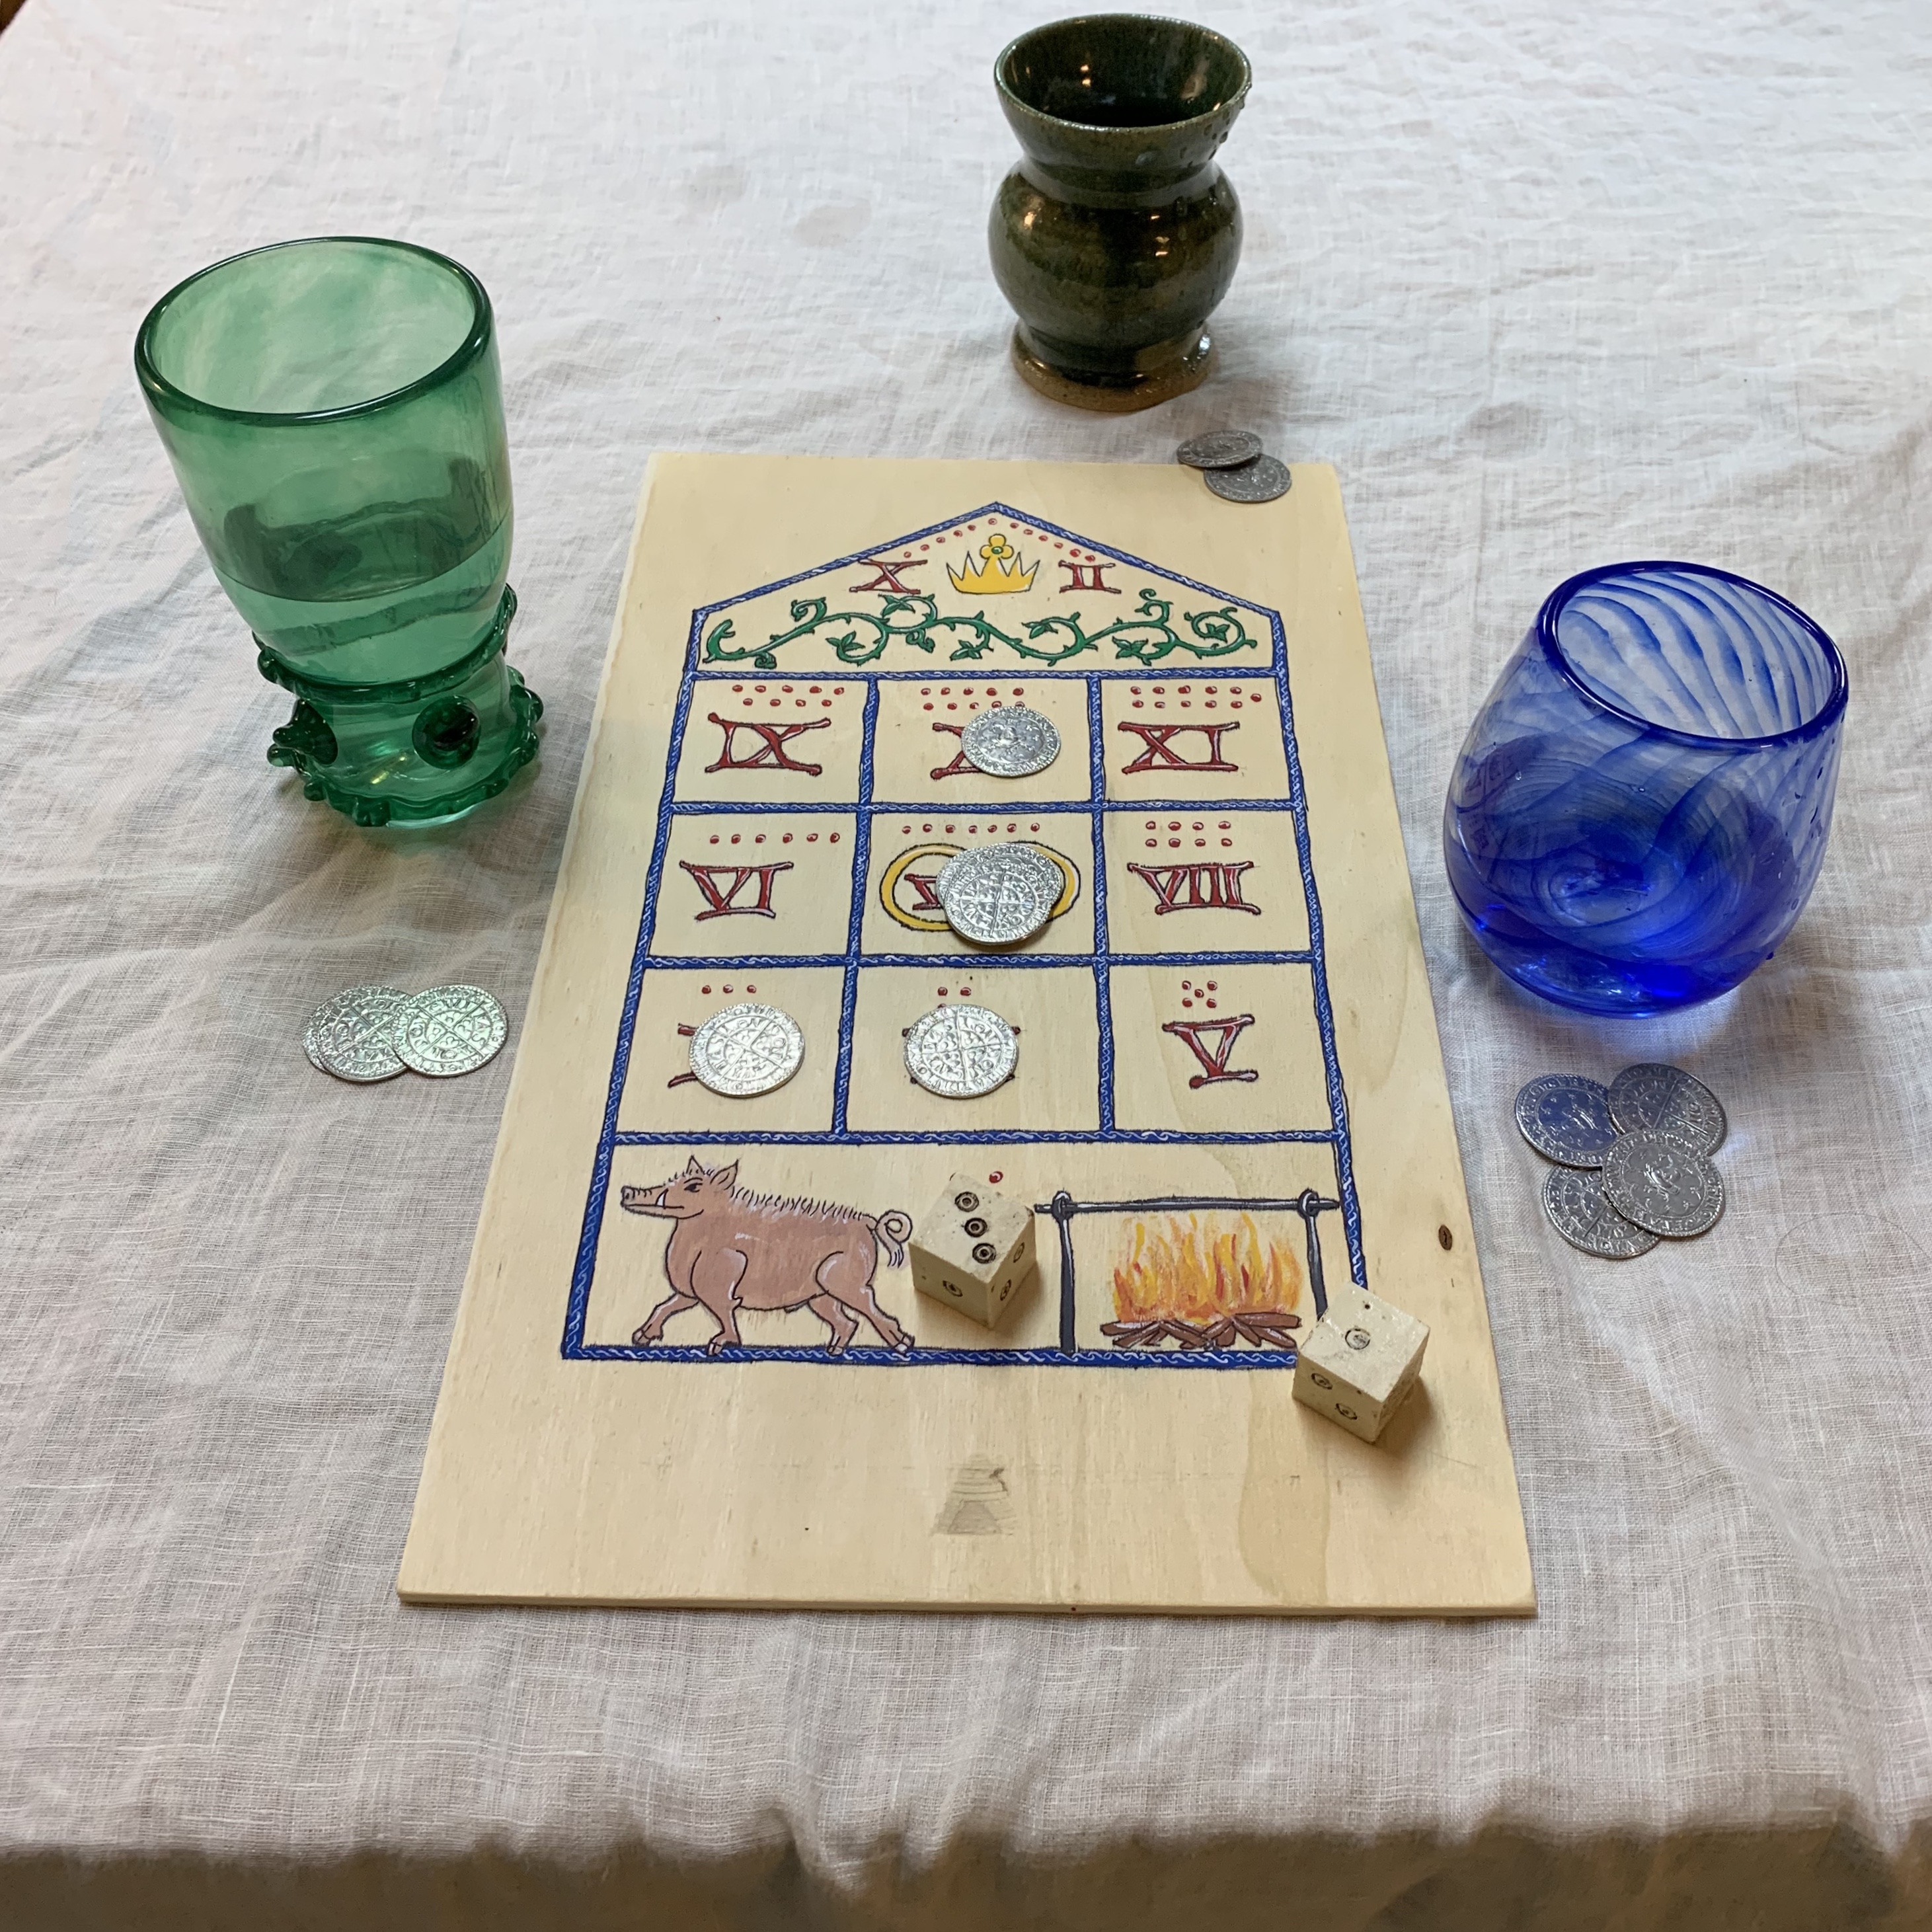
A painted glĂĽckhaus or house of fortune board on the lid of a wooden box used to store medieval games

I just finished a fun, simple project — painting a glĂĽckhaus board on the lid of a wooden box that I can use to store all my historical games! I’ve been thinking about a better way to store my historical games for a while. I had used various pouches and bags in the past, but didn’t like the feeling of infinitely nesting bags. At some point I must have seen someone else’s games box with a board painted on the lid and fallen in love with the idea.

GlĂĽckhaus (also spelled glĂĽckshaus) happens to be my very favorite historical game. It’s dead simple and clearly designed to be played while drinking and talking, requiring no strategy or even your full attention. Here’s a nice one-page guide to gameplay; roll the dice, place or take a coin, and several numbers have special actions. Most of the examples I’ve seen of historical (and re-enactor made) glĂĽckhaus boards are rather complex, but I liked the more simple design of one shown in the Wikipedia article linked above and used that as the basis for mine.

Can’t wait to play at events! You can use any dice and counters you want, I like playing with my replica groats and resin “bone” dice but have also had a grand time with plastic modern dice and standard US pennies.

I used a wine gift box and a set of primary color acrylic paints, and aside from procrastination it was easy to finish by stealing a few minutes here and there during the evenings after my baby went to bed. It took me a while to find a box that I liked, but otherwise all the supplies for this are readily available at any craft store, or easily ordered from Amazon.

I’ve put together a list of supplies and tips for making your own (on the assumption that you know how to do basic SCA scribal painting). In my next post, I’ll be giving you more information about putting together a historical gaming collection of your own, including links to information/research and some specific products.

(Reminder that I get a small kickback when you purchase products from the Amazon links in my posts.)

Supplies list for a medieval games box with a painted lid:

Wine gift box — there are lots of box options, but this was the only one I found that was large enough to make a good game board but still inexpensive

Acrylic paint set (option 1) — I used a set of just primary colors but even for this simple project wished I had had more options, so I’ve linked to a slightly better set that I’ll be getting to replace my basic one. If you want to go all out, here’s a set with lots of colors!

Basic inexpensive detail paint brushes, at minimum round size 1 and size 0.

Plus a pencil, eraser, ruler, ultra fine permanent black marker, and access to some inspiration images.

Tips for making your own:

Use pencil to sketch the game board and any designs you want to do; this is where inspiration images are helpful, so have your Googlin’ fingers ready. (You are more than welcome to use mine as the basis for your own! Please copy me!) For glĂĽckhaus, the design elements are numbers on each square, and images on the three “special” spaces — a pig on 2, something to symbolize a wedding on 7, and a crown for the royal 12. Historical game boards were often quite lavish, with every bit of space filled up with lush art. That’s not my style, though, and I think that’s okay.

From there this is just like doing scribal painting, but with acrylics and wood instead of paper and gouache. Start with solid colors, layer on any shading and whitework you want, finish by outlining everything in black. I opted to leave the backgrounds blank and keep the design simplified. I also chose to do a generic Gothic style to be more in keeping with my gear and persona even though glĂĽckhaus is a Renaissance German game.

I opted for Roman numerals to look more historical and “pips” for those who have a hard time reading them. My pig has a roasting spit (that he’s running away from, ha ha) and I did simple interlocked rings for the wedding; a more historical option for the wedding space would be clasped hands or a fede ring. I added some vinework to fill the space on the 12, and did a simple blue with whitework border around everything.

There are a few things I’d change if I do another one, but overall I am pleased with this addition to my event gear. History was fun! Medieval games are fun! Having my own personalized and fairly nice glĂĽckhaus board is a great feeling. Plus, the box has all my other games. Again, I’m working on a follow-up post with more general information about stocking your own historical games box. Stay tuned 🙂


To Speak and To Keep Silent

You might have noticed I didn’t post here for a year. I thought a lot about just letting that slide past without acknowledging it. After all, I had a baby — of course I have less time for the SCA and to blog! But that would be a lie by omission. It’s true that having a child has totally shifted my world and that I’ve been so busy that I hardly have time for anything, but that’s not the whole truth. And I think I want to talk about some of the rest of that truth.

A lot of it is deeply personal — I’m recovering from some very intense and frightening experiences around my pregnancy and my son’s earliest weeks, and have turned inward to process. The energy I normally turn outward has been directed toward healing myself and caring for my loved ones. Everything else faded into the background. I feel zero shame about that, and in fact I am intensely proud of the work I’m doing; I’m the best version of myself that I’ve been in a very long time (maybe ever!). I also have been open about all this because I believe strongly in ending all stigma around mental health, especially postpartum/for new parents.

But there’s more on top of that. The truth is, I am really questioning this whole hobby. I’ve been open about all this in my own social circles, but I want to talk about it here.

(There are cusses in what follows.)

Let’s go back a few years, first. Many of the responses to the push for inspirational equality were shitty to the point where I questioned if there really was a place for me in this organization. It’s pretty fucking demoralizing to have have to ask for a seat at the table, to have a large number of people argue with the very idea of your request, and then to have your request put to a popular vote. The final “compromise” language added to Corpora still bothers me, and while it’s heartening to know it’s finally being revisited, the whole experience really left a mark on me.

Now events over the last year (and change) have made me question my place in this game far more urgently. First, I’ve been personally struggling with what it means to devote my time and energy to playing pretend when the real world I really live in is in such peril. The political reality in the US right now is horrifying and I want to give all the energy I have to making things better. I’ve gotten active politically in new and exciting ways, and that has taken over the time and brain power I used to have available for taking on SCA service. Not to put too fine a point on it, but right now I can’t justify running a medieval nerd club event or holding a medieval nerd club office when I could be working to get children out of concentration camps.

On top of that, some of y’all in this game have never done equity work and it shows. That whole CAID swastika trim situation was… depressing. Most folks in my circles came around eventually, but damn, it never should have been that hard. Even if we had gotten to the point of someone not really realizing that, hey, maybe let’s not wear swastikas, especially in the midst of a terrifying global rise of white nationalism, there’s this simple rule that a lot of folks seem not to get that when marginalized folks say “this harms me,” the correct response is to listen.

That was not what happened. Every comment and Facebook post defending the wearing and display of swastikas stood as a statement that this game isn’t safe for everyone. Every comment and Facebook post decrying the “angry internet mob” told me that many of us can make room for symbols that are inextricably linked with violence more readily than we can make room for dissent. Anger at an outcry over a hate symbol is not brave, it is in fact exactly what allows marginalization to persist. It’s the oldest tool in the bag. If we are so fragile that we cannot withstand criticism of those in positions of power, we are doomed. If we do not have a place for indignation, I can’t stay, because I just can’t be silent when social justice is at stake. I’m not trying to be insufferable, I mean I literally can’t shut up, even when it harms me to speak up.

There is a fundamental disconnect between different parts of this big conversation, the same disconnect that I see writ large on our social and political landscape. I know where I’ve chosen to stand in the real world, and I am honestly no longer sure if standing there is safe or even possible in this dream we claim to be building together. Things have calmed down since first this broke, but for me the damage may be too deep to move on. (I know it was for others — I have friends who left the SCA over all of this. There is no neutral, you either support marginalized people’s safety or you don’t, and too many of us didn’t and we lost good people as a result.)

Maybe I was wrong to think there was really a place for an outspoken antiracist dyke in a hobby devoted to recreating medieval Western Europe. I have struggled for years with this hobby being the whitest part of my life and I have feared becoming an accidental mouthpiece for white power. I am heartened by many of the institutional actions taken in response — the BoD statements, updated Corpora, etc. all gave me hope that we can make this work. I can also choose to take solace in the how many people have spoken up — it must have been a lot to get a response from the BoD so quickly — and focus on everyone in my sphere who has actively taken a stand for safety.

But is this really a place where I can raise my kid? Can I really engage with the parts I like and overlook the rest of it? The CAID trim incident was not isolated. There have been other deeply troubling issues that have come to light, individual and institutional racism, sexual violence overlooked and predators allowed to stay and play… These aren’t questions any of you can help me answer, sadly, and I’m not even sure what would help me find answers. I’m pretty invested in this dumb game, but I feel like I need to get serious about figuring out if it’s worth the investment, and how much it’s really invested in me.

I’ve been reasonably open about wanting to bail, as have others. The response hasn’t always been what I would have hoped. To be perfectly frank, I AM being dramatic! I DO want to get a reaction from people when I say I might quit! I want people to be outraged, I want those with privilege to leverage it to fix these issues! My participation in this organization is conditional, and should be more valuable than the participation of racists, white supremacy apologists, misogynists, sexism apologists, homophobes, trans exclusionists, and other people actively doing harm.

Also don’t tell me I can’t quit. I’m tired of seeing cis, straight, white folks say anything along the lines of “If the good people all leave the assholes win! You can’t quit, you have to stay and fight!”

Here’s the deal:

1) Marginalized people don’t owe you shit, if folks have to bail for their own well being do not grump at them about it.

2) This is supposed to be fun. If it’s work, it’s not fun.

3) If you have the will and energy and privilege and patience to fix it, thank you! Not everyone does.

As a queer woman, my enthusiasm for fixing this game is very, very low. I have to fight for my space in this world already. I am already allocating my world betterment energy; when I come to an SCA event it’s to get my medieval geek on and have fun, not to do the same social justice activism that, while fulfilling, is also draining. I don’t owe the SCA shit. If the assholes win, we can start a new and better game. If you build me a place where I can play dress up and make historical food and not have to put up with bigotry, I’ll be there with bells on; I’m no longer sure the SCA is capable of being that.

I also want to point out that I’m able to say this stuff out loud in part because I know I’ll probably get a lot of words of support. I’d like to challenge each of you to consider who in our community is also questioning if they belong but won’t speak up about it. What are we doing for them?

I found the SCA when I was 17. If I were 17 today and found the SCA, I don’t know that I’d stick around. If we want to make it to AS C, we as an organization must do some major work to become more attractive to new (young) participants. Our choice is whether we want to attract the ones who carry tiki torches and chant “blood and soil!” or the ones who want to wear rainbow armor with their multiethnic friends and already know their way around gender pronouns.

Time to choose.

An Tir West War Reflections

Update: I have enabled Amazon affiliate links on this blog; I figure I shill for Amazon for free, maybe it’s time to let them give me a cut! If my enthusiasm for my new camp bed persuades you, please use the links in this post so I can keep the candles lit. 

We made our annual pilgrimage to An Tir West War for the Cooks’ Playdate last week. It was our first major SCA excursion as a family of three, and all in all was a wonderful adventure. We have a new tourney vehicle — A VAN!!! — that I am very much in love with. We panicked and overpacked, but that’s a learning process too. Kiddo had a great time, and so did moms.

We stopped at some of our favorite places along the Oregon coast on the way down and back, and got to drink in some of the most beautiful scenery in the world. We also introduced the kid to tasty shellfish — he is a bay shrimp fan! — and he had his first ice cream. So fun!

Two women and a baby sitting outdoors at a table for a medieval feast
Two mom energy! Photo by Mercy Neumark

I cooked very little at the Playdate, which I anticipated because I know how much it takes to wrangle a small human. I threw together spring greens and herb salads for a couple of dinners, which were well received; I used walnut oil and white balsamic vinegar for dressing, and put some big flake salt on the side. I cooked some shelled peas from my garden with cheese rinds for flavor, and they were fine but not spectacular. I made Iron Age Celtic Glop, with beef, fresh favas and fat-hen from my garden, and oats. It was quite tasty, although I should have used whole oat groats instead of stone milled oats. I love the flavor of fat-hen, it’s got this rich earthiness that’s just amazing.

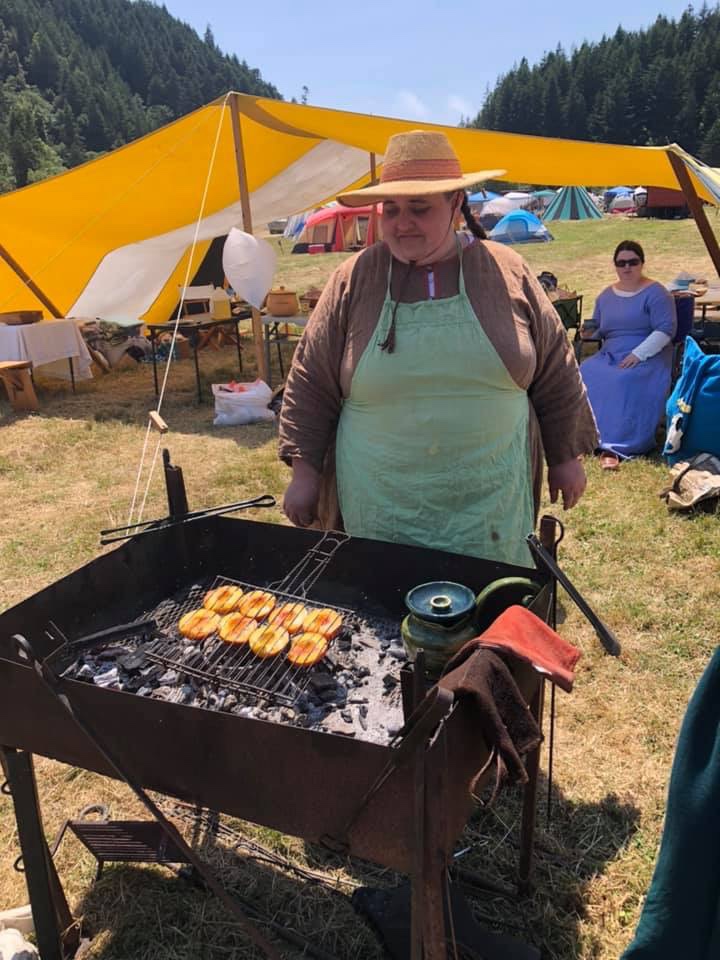
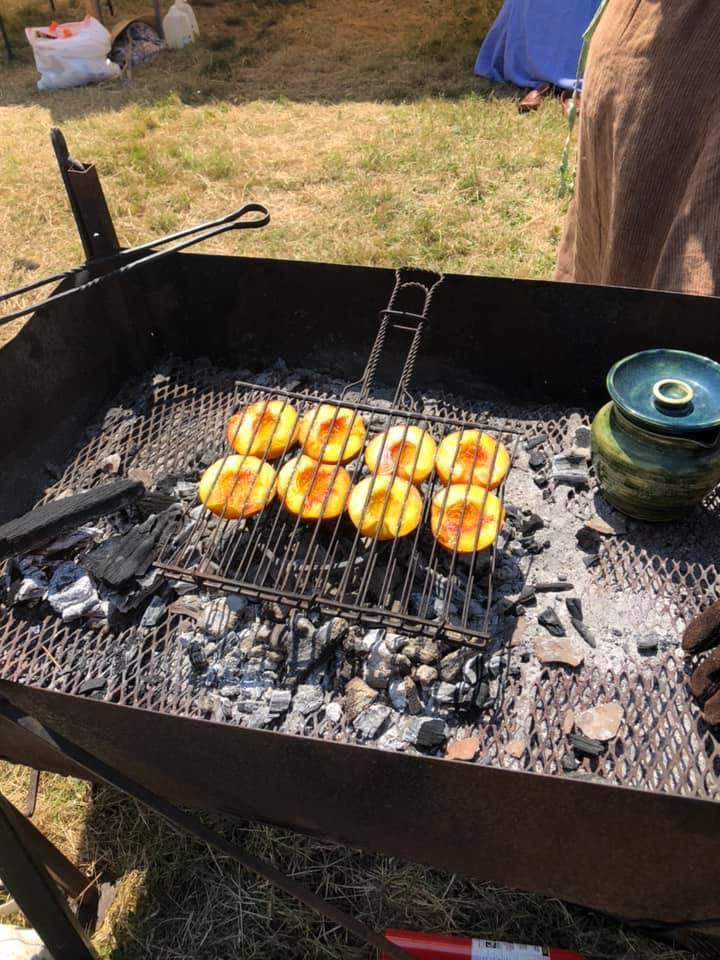
I also did some grilling experiments not anchored in research but that turned out phenomenal and that I’ll definitely repeat. At my wife’s suggestion, I grilled peach halves, then topped them with a little mint, some thinly sliced matos cheese, and a drizzle of honey. They were utterly divine. On our last day there I went a little wild trying to use up some of the excess food we had brought and wrapped various cured meats (salami, coppa, prosciutto) around pitted dates, then skewered and roasted them. If you’ve made bacon dates, you know the magic of sweet dates and salty pig. These were better than bacon dates in my opinion! So crispy and delicious. Will definitely add both of these discoveries to the regular rotation.

Cook at work, photo by Mercy Neumark

If anyone finds a grill basket like this, I need one! Photo by Mercy Neumark


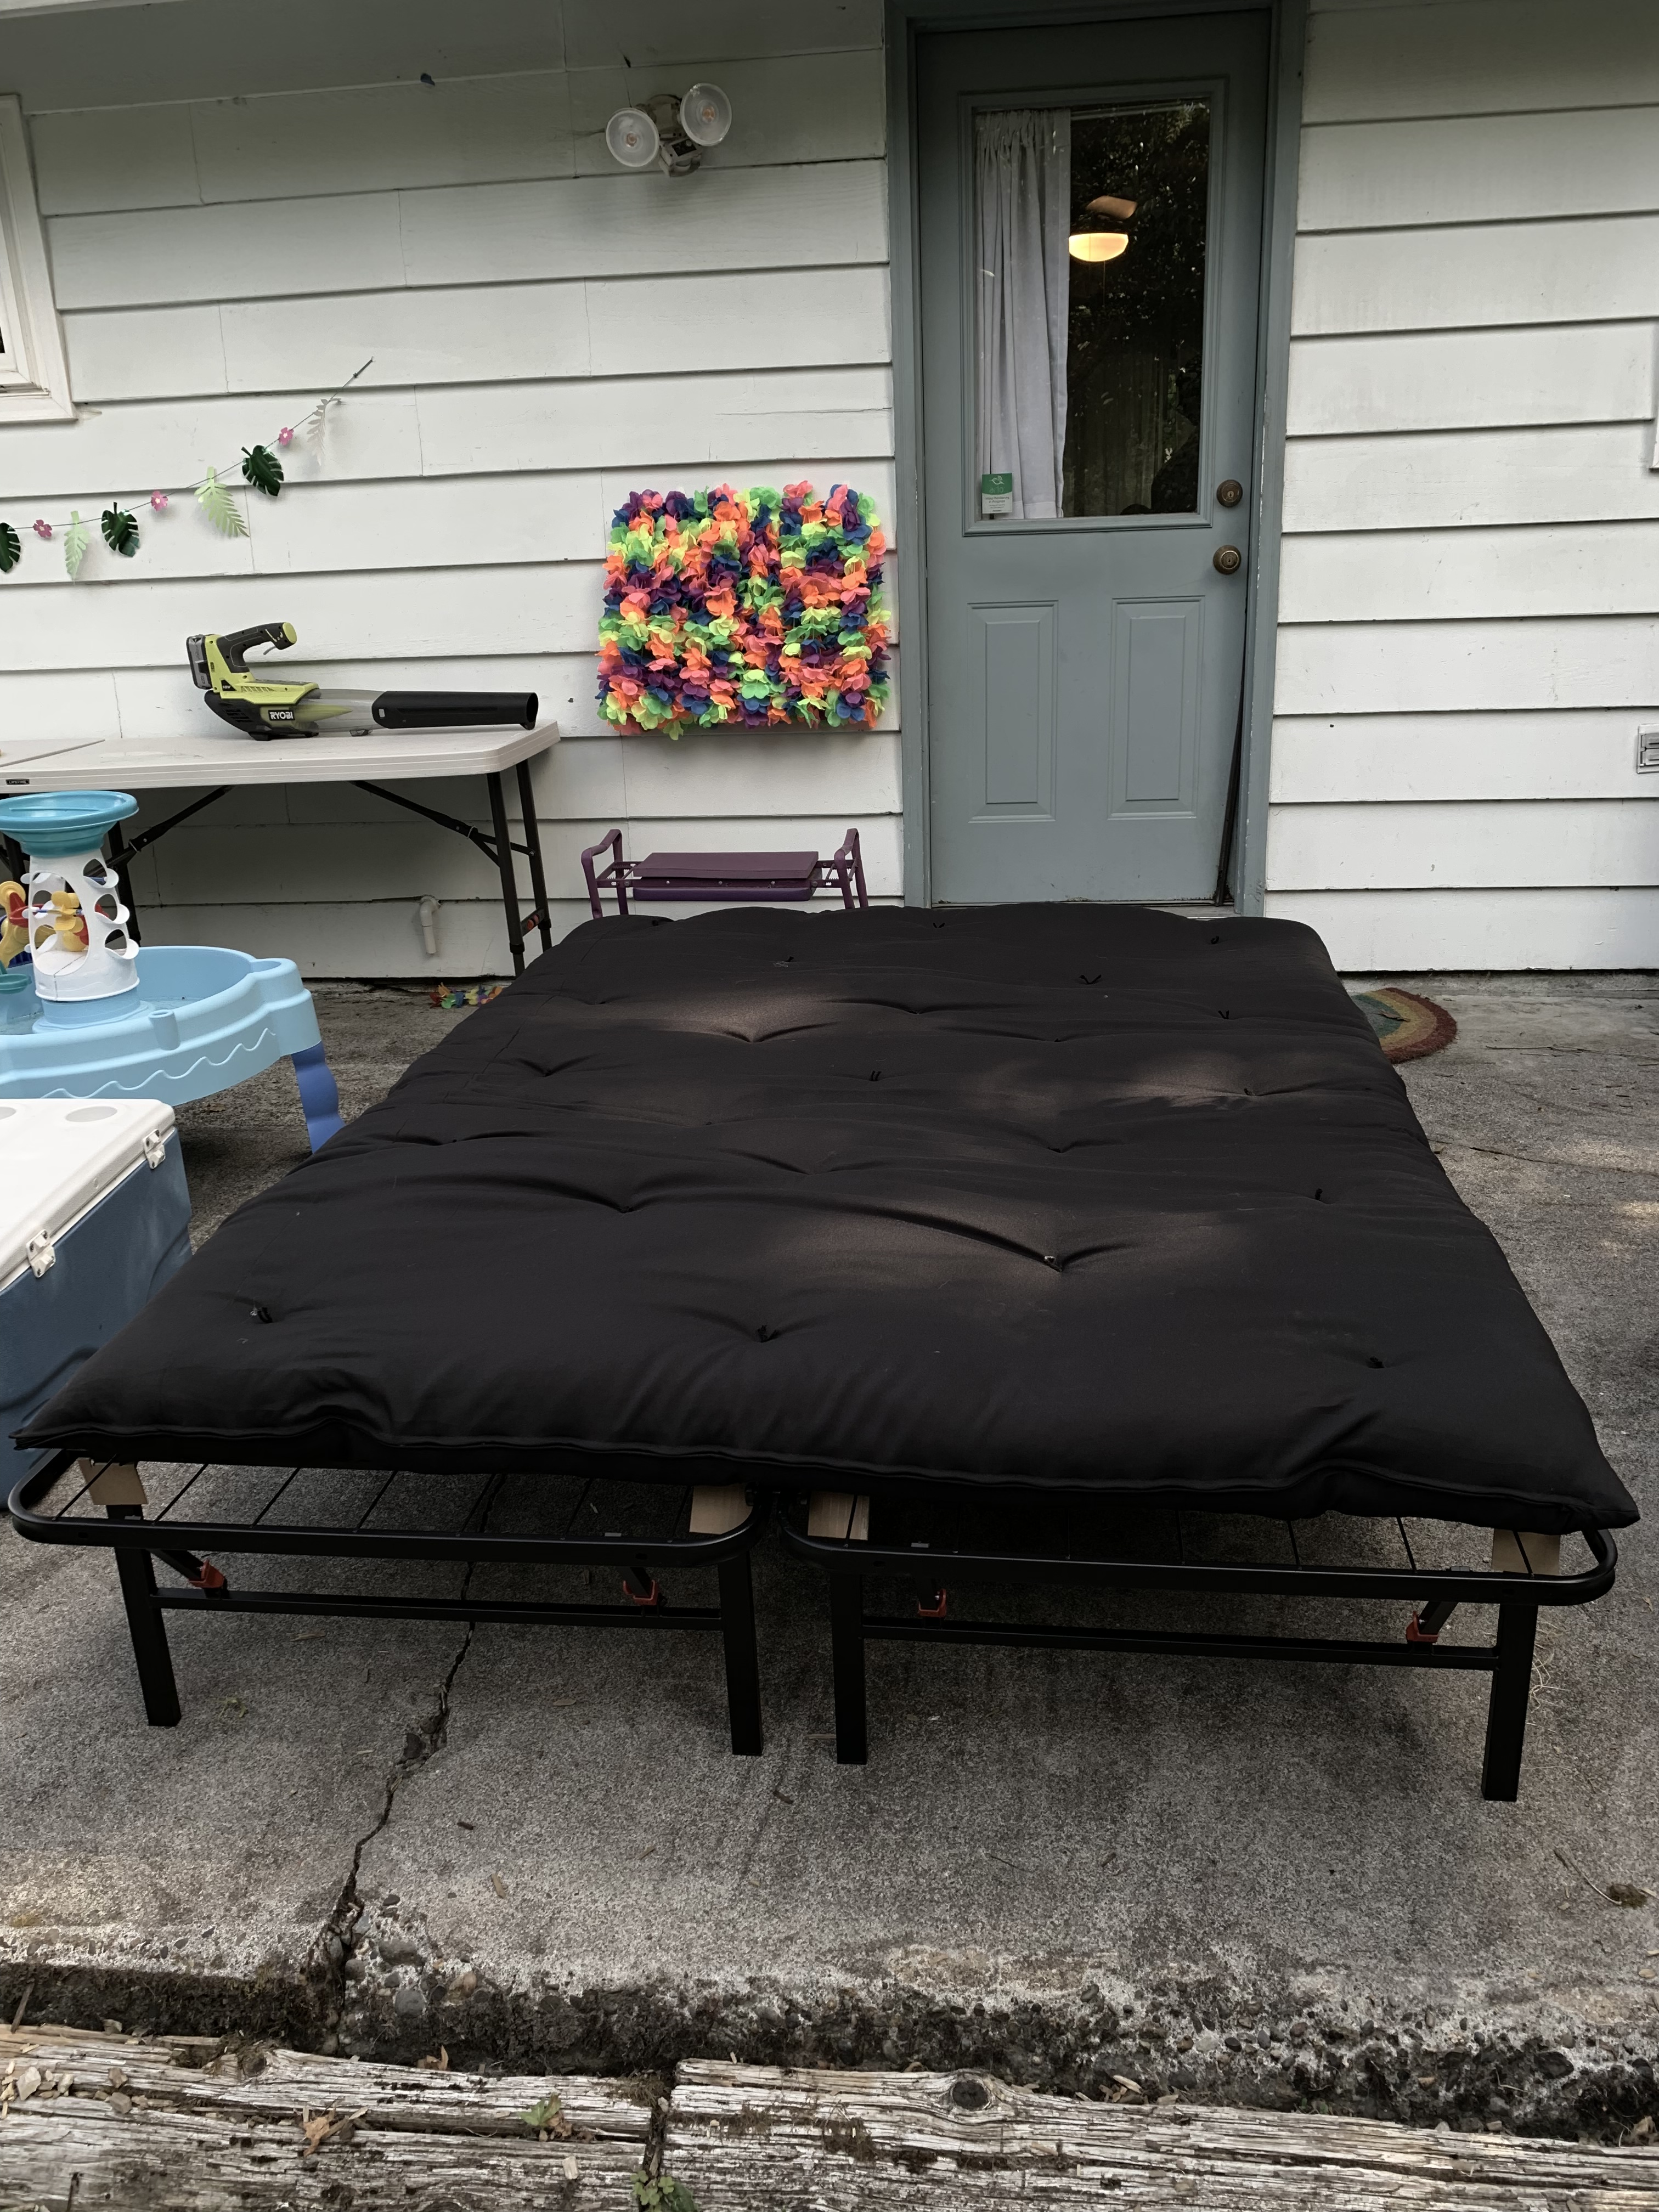
We got some new gear for this trip that was absolutely game-changing, knowing we had the space to bring some larger things for comfort. I keep learning that the secret is to pack heavy on infrastructure and pack light on everything else. The big thing that totally made this long weekend awesome was our new camp bed from Amazon — a folding bed frame and a summer-weight futon. Most comfortable sleep I’ve ever gotten while camping! Seriously, these are so, so awesome.

The bed set up. I cannot capture how truly wonderful this was.

We also brought our fancy camping privy (and refill bags) and it made getting up to pee in the middle of the night (with a sleeping baby) much less of a production. Plus, it’s a great seat in the tent during the day with the lid closed and a sheepskin on top! The surprising hit of the weekend was our cow skin from Ikea. It was great to sit on in the grass with the kiddo, much more versatile in damp or slippery grass than a blanket. Oh, and not a large item, but I’m glad we brought a pile of folding seagrass baskets, also from Ikea, because they’re great to bring empty and then use to organize small things (like baby toys and snacks).

I came away with a better sense of what I want at events. We packed way too many snacks and brought lots of clothes and supplies for the baby that we just didn’t end up using. I didn’t wear all the garb I brought and I ended up wearing modern shoes because the ground was a little too challenging to manage when I needed to also be able to hold and chase after a kid. I came away from this event ready to get rid of a lot of SCA stuff that I think I’m just done with and streamlining / optimizing the rest of it. And I’ve accepted that I need to get some unobtrusive modern shoes.

It was great to get to see people who we don’t get to spend time with often enough. I wish I had made more time to get out of camp and be social. The people are what keep me coming back to this game.

Eventing with a kid is an adjustment for sure. I’m still having a lot of conflicting feelings and thoughts about how much time / money / effort I really want to spend on the SCA right now. But all in all, it was a good experience and we had some magical moments. Taking kiddo to see the creek, pulling him in a wagon, watching him “help” in the tent… lots of good things.

One night after the baby went to sleep, my wife and I spread out the cow skin and lay under the stars together. We watched satellites and identified constellations and talked and cuddled. Just as humans have done for as long as we’ve existed.

My latest arts and sciences project

I haven’t had much to say here lately and probably won’t be posting much for a while because I’ve been busy baking something very special, and it’s finally out of the oven:

Surprise! It’s a baby!

Fun aside: I made a truly absurd number of SCA clothes for him during the tail end of my pregnancy (I had to go on bedrest, I got really bored, it was a whole thing) so in theory at some point I’ll have cute pictures of him in garb :}

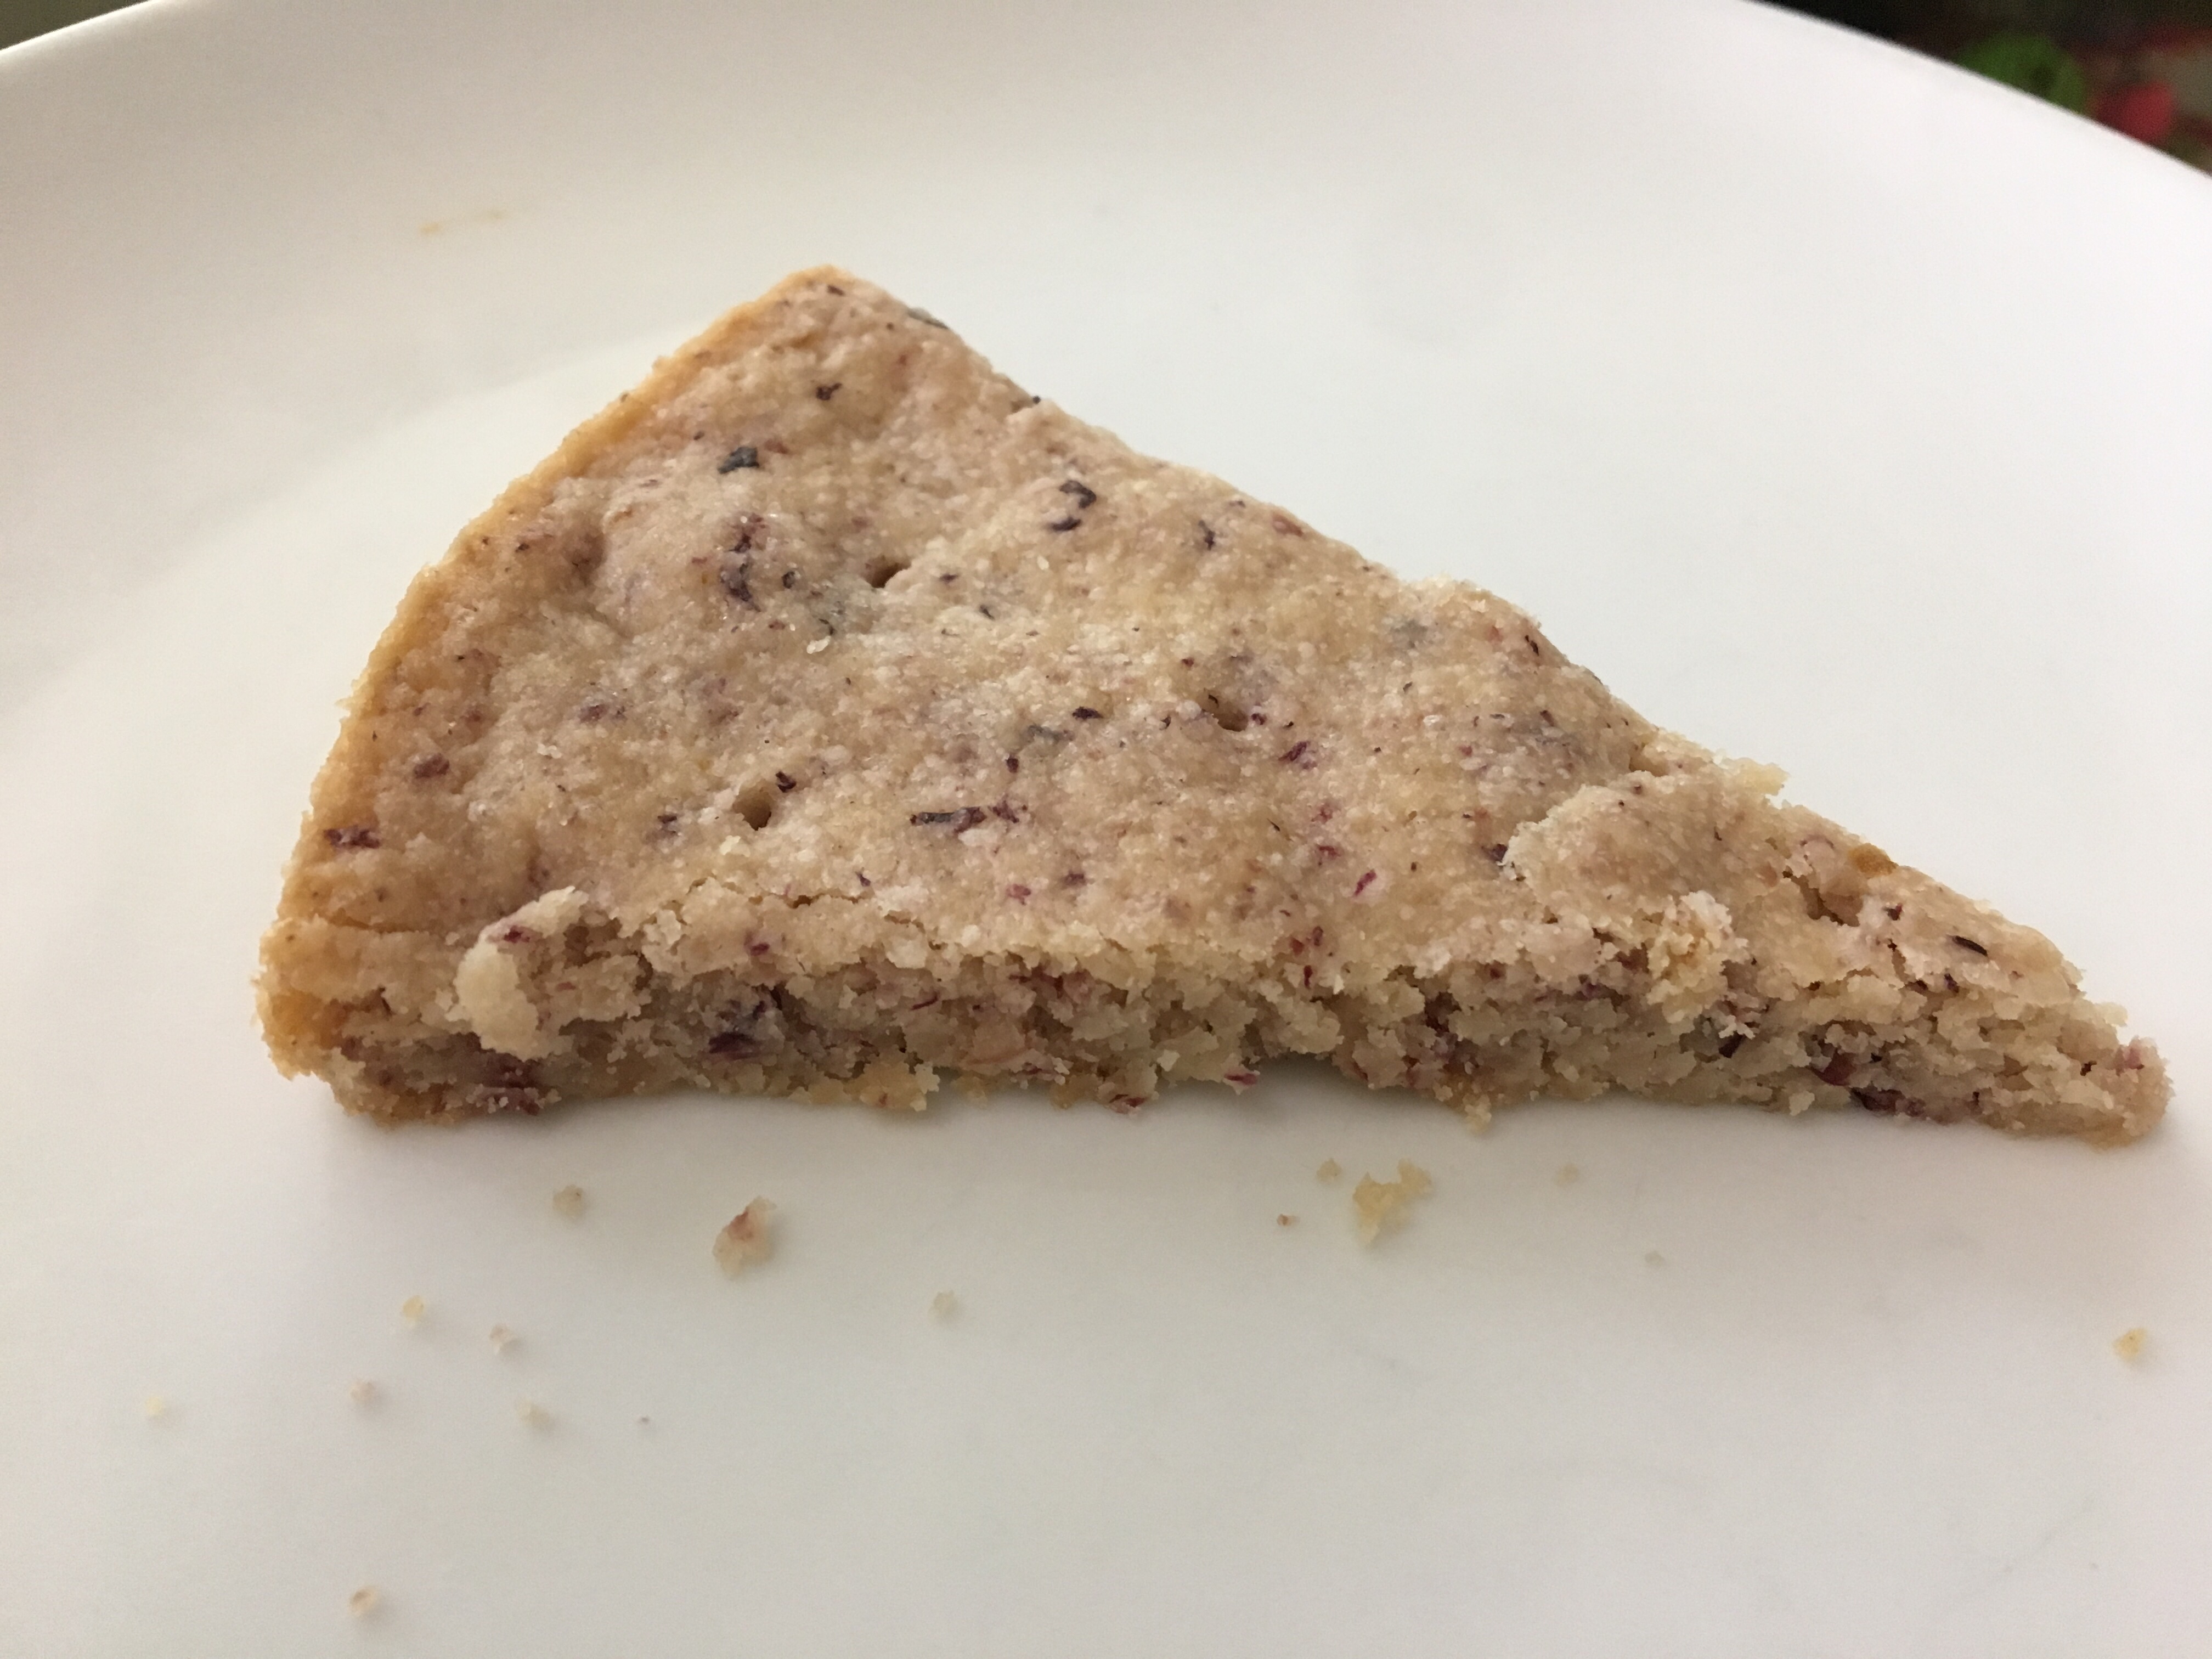
Rose Shortbread

I know I’m in the minority, but I genuinely love rose water and rose-infused food. My roses have been going wild for the past few weeks and I wanted to capture that early summer flavor. This isn’t based on a historical recipe, but I don’t think it would be out of place in an SCA context.

Rose Shortbread

  • 1 stick (4 ounces) butter
  • 1/3 cup sugar
  • Petals from 2 small to medium roses
  • 1/2 tsp salt
  • 1 tsp rose water
  • 1 cup flour (all-purpose, whole wheat pastry, or bolted heirloom wheat)

Preheat oven to 300F. In a mortar or food processor, grind together the petals and sugar. In a large bowl or stand mixer, cream the rose sugar with the butter until fluffy. Add the salt and rose water and beat well to incorporate. Add the flour and mix thoroughly; I find it helpful to use my hands at this stage. Press dough evenly into a greased 8-inch cake pan, and use a fork or skewer to poke holes all over for venting. Bake 35-45 minutes or until lightly browned on the edges. Slice immediately after removing from oven, then allow to cool in the pan at least 10 minutes before carefully turning out onto a wire rack. Store in an airtight container and eat within a few days.